Tag: faq

  • Shirt Master Class

    Shirt Fit Preference

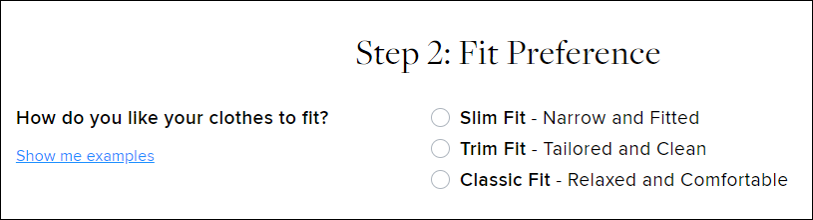
    During the pre-appointment survey, your client selected an overall fit preference for his upper body garments.  The chart below explains how the chosen preference will affect the ease added to your client’s shirt. Remember ease is the amount of fabric added to the shirt over the client’s core measurement. 

    Body fit

    Preference

    +3,

    Slim, narrow and fitted. 

    Generally for younger clients looking for a close fit with minimal fabric around the waist and chest.

    +4

     Trim, tailored, and clean.

    A great starting place for new clients. The shirt will follow the shape of the body without being restrictive.

    +5

    Classic, relaxed and comfortable. Best for more traditional Clients who are most interested in comfort.

    Ex. Your Client has the following body measurements and selects a slim fit preference.


    Body (Core) Measurement

    Body Fit (based on preference, see chart above)

    Finished measurements (How the shirt will be made) 

    Chest

    40

    +3

    43

    Waist

    34

    +3

    37

    Hips

    38

    +3

    41

    Table of Contents

    Customizing the Shirt Fit

    The pre-appointment survey will create a great fitting shirt but you may also wish to customize the fit further for your client. 

    3” is added to your Client’s wrist measurement in order to produce the finished cuff. This ensures that your Client has enough room for comfort.  

    We can also make an adjustment to account for the Client’s watch. If the Client would like to wear his cuff over his watch, this adjustment can be made by choosing the “Watch” option in the Shirt Product Profile:

    • The options for adding a watch are as follows:
      • Left cuff
      • Right cuff
      • Both cuffs
      • Large Left cuff
      • Large right cuff
      • Large both
    • Adding the watch option adds .5” to the finished cuff size. 

    Adding the large watch options adds .75” to the finished cuff size.

    T.A.P.E. automatically utilizes your client’s core measurement shirt length to create a tucked in shirt. If you client would like to wear his shirt untucked, utilize the shirt fit quiz within the shirt product profile. 


    When Always untucked is selected T.A.P.E. recommends a length 2” shorter than the client’s core measurement shirt length . Additionally, T.A.P.E. will straighten out your client’s shirt to ensure that there is only a 2” difference between the waist and hip of the shirt. This ensures that your client’s untucked shirt has the correct straighter shape to be worn untucked.

    T.A.P.E. will recommend a Sleeve Fit based on your client’s Fit Preference and core measurements. Our sleeves range from Extra Fitted, our slimmest most popular sleeve, to Full. As you move from Full to Extra Fitted, the armhole of the shirt raises, and the overall circumference of the sleeve is slimmer.


    • Fit Tip: for each sleeve fit the armhole increases or decreases by 0.5”. For each sleeve fit the elbow decreases or increases by 1”. 

    The Armhole and Elbow Adjustment allow for adjustments between the Sleeve fits in .25” increments. If an adjustment is necessary, it will be included in the T.A.P.E fit recommendation. Adjustments can also be used on a second shirt to refine a shirt fit based on client feedback and preference.

    Shoulder Slope

    Most of your Clients will have a normal shoulder frame. However, there is a small percentage of men who need a shoulder adjustment on their custom shirts.  Around 2% of our Clients have sloping shoulders (A body) and less than 1% of them have square shoulders (T body). 

    Instead of looking at the Client’s actual shoulders, observe the wrinkles on the front of the shirt that would indicate that an adjustment needs to be made. If there are no wrinkles on his off the rack shirt, (see first photo below) we recommend keeping the shoulders set as “Standard”.

    To request an “A” or “T” body adjustment on your Client’s shirts, update your Client’s Shirt Product Profile:

    Advanced Shirt Options

    The standard height on most of our collars is 1.5″ in the back and 1.25″ in the front . You can request the collar band to be lowered by 0.25” or raised by 0.25” or 0.5” on all collars except Modern Spread, Modern Button Down, Club, Banded, Two Button Cutaway, and Wing Tip. Selecting to raise or lower will apply to both the back and front of the collar as requested.

    Raising or lowering the height of the collar band allows you to accommodate your Client’s unique proportions. For example, a Client with a long neck may need a higher collar to be proportionate. Alternatively, a Client with a short neck should opt for a lowered collar band height. Additionally, some Clients may want a “taller collar style” which this adjustment allows him to achieve.

    To modify this option on your Client’s shirt, select an option from the drop down menu next to “Collar Band Height Adjustment” under Advanced Shirt Options in the Shirt Style Options section of the order page.


    The standard spacing between the collar button and the first button on the shirt placket is 3.5”. You can request the first button to be raised or lowered in the following increments:

    • 2.5”
    • 3”
    • 3.5” (Standard)
    • 4”
    • 4.5”

    Adjusting the button placement allows for a personalized look and also helps in a situation where the Client has a gap at the top of the placket. The adjustment originates at the first button under the collar button and is then applied down the shirt for the rest of the buttons. For example, raising the button placement brings the first button up closer to the collar and reduces the space between the collar and first button, smoothing out any rolls between the buttons. This adjustment also offers your Client customization options for when he is wearing his shirt without a tie by specifying where on the placket the shirt will open with an unbuttoned collar button. Keep in mind that changing the button placement affects the entire shirt, not just the first button. For example, raising the first button 1” results in every button to come up 1”. The same holds true for lowering the button placement as well.

    To modify this option on your Client’s shirt, select an option from the drop down menu next to “First Button Placement” under Advanced Shirt Options in the Shirt Style Options section of the order page.


    We are able to lower the angle at which the front of the collar is attached to the shirt. This adjustment is best for Clients with a shorter, thicker neck. The collar will be attached to the shirt at a slightly lower angle to provide more room directly below his chin (the factory lowers the front neck drop by 0.5″). Lowering the neck drop gives them a bit more room and prevents the top of the collar digging into his neck.


    We are able to adjust the collar points on the following five collars:

    • Classic
    • Spread
    • Cutaway
    • Button Down
    • Hidden Button Down.

    We can adjust the collar points to:

    • 2.5”
    • 2.75”
    • 3.5”

    The length of the collar point on your Client’s shirt is a very particular adjustment. This is only recommended if your Client requests a certain length. For example, your Client likes a Cutaway collar but wants a longer point length for a more proportionate look.  Keep in mind that you cannot adjust the collar band height and the collar point length for the same shirt.

    Tie space” is the distance between the top parts of the collar points when the shirt is buttoned. Our standard tie space is 0.25”. We offer the option to adjust that spacing to 0”, 1/8”, or ½”.

    Tie space provides room for a tie knot. Our standard tie space is ¼” and adequate for most Clients. However, some Clients might want more or less space in this area depending on the look and type of tie knot. “0” tie space gives a clean, angular look to the collar, and typically not recommended for Clients that wear ties, as it doesn’t provide any extra room for a knot. Conversely, if your Client wears ties often, and ties a larger tie knot, adding some room in the tie space will allow the tie knot to have room between the collar points. Typically, collar points shouldn’t cover any part of the tie knot.

    Our shirts come standard with top stitching, which is 0.25” from the edge of the fabric. If you select this option, the stitching will be be 1/8” closer to the edge on the collar and cuffs.

    Edge Stitching provides a clean look to the collar and cuffs. Although this option might be unknown to a lot of Clients, it is a nice option on a more “formal” shirt. Consider this similar to opting for no pic stitching on a Sportcoat lapel.


    We offer the option of placing collar and cuff fabric on the bias. Placing fabric on the bias means turning it on a 45 degree angle. There are four options to choose from when requesting the fabric to be produced on the bias:

    • Entire cuff
    • Entire collar
    • Interior cuff
    • Interior collar

    This style adjustment adds a unique look to a shirt collar and/or cuff. Put simply, it draws attention to these areas, as placing the fabric on the bias will look different than the pattern on the rest of the shirt. This is best used for a casual or social shirt and we recommend only adding this option once you’ve discussed with your Client how this Styling option will look. Keep in mind, this option will be most noticeable on a pattern or striped fabric.

    To add this option to your Client’s shirt, select an option from the drop down menu next to “Collar and/or Cuff Bias” under Advanced Shirt Options in the Shirt Style Options section of the order page.


    Common Fit Issues

    A gap can occur between the collar and the first button due to posture or body shape.  The most common fix for this is to raise the first button on the placket so that it is closer to the collar button.  When you raise this button, the remaining buttons will be spaced accordingly. The most common amount to adjust this is 1”. Feel free to reference the Custom Shirt Adjustments article for more details on the various options available. 

    In order to have the first button on the placket raised, select the First Button Placement in the Advanced Shirt Options on your clients profile. In the First Button Placement toggle you can select to increase or decrease the First button in .25” increments.

    A roll under the collar band is normally caused by the back of the collar band being too tall for the Client’s neck. The best course of action is to lower the collar band, if this is available with your Client’s preferred collar style.  (See the Custom Shirt Adjustments article to learn which collars can be adjusted.) Another option is to opt for either the Modern Spread or the Modern Button-Down, which automatically have a lowered collar band. 

    Also, this is not as common, but the Client may need a shoulder adjustment (A or T body adjustment). Please reference the “Does my Client need a shoulder adjustment?” question above.

    The best way to reduce the flare at the hip is to adjust the measurements for the finished waist/and or the finished hip to straighten out the silhouette.  This can be done by increasing the finished waist and/or decreasing the finished hip. Ideally, the shirt waist/hip difference would not be larger than 6” in order to ensure there will not be a flare on the shirt.

    Shirt Parts

    If your Client needs a different size collar, different size cuff, or an additional pocket, you can submit a shirt part order instead of a remake. If the measurement adjustment is more than 1”  larger or smaller than the original collar or cuff, or if the base or contrast fabric is sold out, we won’t be able to produce the shirt part, as a tailor will likely have difficulty attaching the new parts. In this case, it is best to submit a return/remake. Please keep in mind that we cannot produce shirt parts for Indigo or Non Iron fabrics, or shirts that have been Soft wash treated.

    Shirt Fabrics

  • FAQ: 2022 Summer Event

    NEW! SHAREABLE MOTION GRAPHICS!
    Download these assets to help you share the Summer Event with your Clients! We have optimized these 2 graphics in the correct formats for you to share via text messages and social media. Get the message out to your unsubscribed Clients, your social media followers, potential new Clients, Client spouses shopping for gifts, guys returning to the office, and more. Encourage them to shop now for the best selection of sale product.

    CLICK HERE TO DOWNLOAD THE TEXTABLE GRAPHIC>> 
    Download this textable .GIF to share the Summer Event with your Clients!

    CLICK HERE TO DOWNLOAD THE SOCIAL MEDIA GRAPHIC >>
    Download this .MP4 to share on Instagram and Facebook. Here’s some sample post copy to get you started on the caption:

    Our 2022 Summer Event is live! Save up to 40% off items from across our 11 categories of custom-made menswear. Connect with me, your Personal Stylist, and shop today for the best selection of items to add to your J.Hilburn wardrobe.
    #jhilburn #personalstylist #oneatatime #custom #custommade

    SUMMER 2022 SALE EVENT DETAILS

    All the information and the FAQ on our Summer Event sale are here! We are offering a private sale starting June 14, and going public with the sale on June 20. Read on for everything you need to know to make the most of this much-anticipated event!

    Promotional Headlines:


    Private Sale Period — Tuesday, June 14
     through Sunday, June 19:

    • CV Payout on Summer Event Sales: Custom Shirts included in the bundled “Buy 3 or More, Get $20 Off Each Shirt” will be at 100% CV throughout the entire promotion. All other sale categories will be at 75% CV on sale items during the Private Sale Period and through the end of June.  
    • Stylist-Led Marketing During Private Event: No marketing emails will be sent from the Home Office to Clients during the Private Sale Period.
    • Stylist Outreach to Clients: Reach out via the Virtual Assistant, text and email to publicize the Private Event to select Clients.
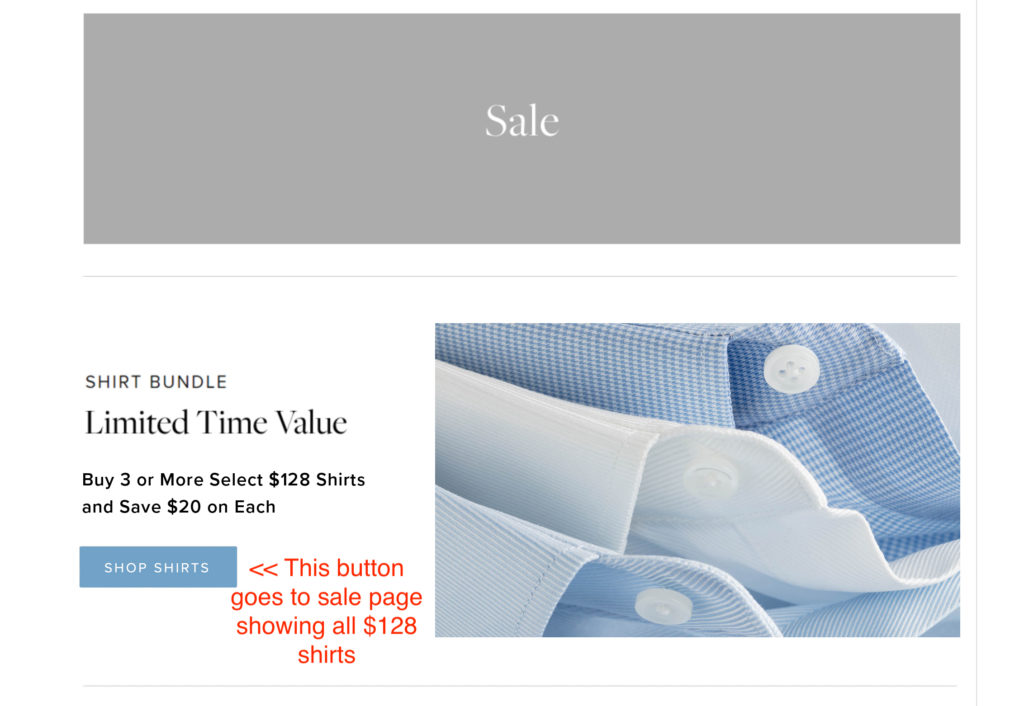
    • Where to Find Sale Product on the Website: Sale prices will be visible on JHilburn.com, with sale items merchandised in the Sale section only. “Sale” will be added to the main website navigation categories and will take you to the main Sale page. The Custom Shirts included in the bundled promotion “Buy 3 or More, Get $20 Off Each Shirt” will be on a separate campaign page — click “Shop Shirts” on the main Sale page to go to the Shirt Bundle campaign page. (See visual below.)
    Public Sale Period — Monday, June 20 through the month of July:
    • Bundled Shirts continue at 100% CV throughout the entire promotion, and sale items at 75% CV through July 31. 
    • Marketing emails and social media posts from the Home Office will begin to all Clients. Stylists should still continue their Client outreach during this time.
    • Homepage of JHilburn.com will highlight the Summer Event and link to the Sale section of the website.


    Things to Remember:

    1. Products on Sale

    The majority of product that will be on sale will be from Fall/Summer 2021 and older. There may be a few, but not many, Essential fabrics on sale. At this time, we are not planning to put any Spring/Summer 2022 fabrics on sale. 

    1. JHilburn.com

    Except for Custom Shirts, all Summer Event product will be merchandised online ONLY in the Sale section of JHilburn.com—sale product will not be displayed in its category alongside full-price product. The Custom Shirts included in the bundled promotion “Buy 3 or More, Get $20 Off Each Shirt” will be on a separate campaign page — click “Shop Shirts” on the Sale page to go to the Shirt Bundle campaign page. (See visual above.)

    1. Use JHilburn.com to sell sale product

    You will have some fabric swatches for sale products, but most likely not all of them since there are previous season fabric swatches in this sale. This means that you will need to be familiar with JHilburn.com to sell Clients the products that are on sale.

    1. Quantities

    Products on sale are limited in quantity, so it is to your benefit to start selling sale products right away on June 14 while quantities are still available. Enter your orders as soon as you take them throughout the Summer Event. Don’t wait, as supply may run out.

    1. Work Digitally

    We have seen the best success during Sale periods, when Stylists work efficiently with their time and use their digital tools – the Virtual Assistant, text, email, virtual appointments, etc.  

    Click here to download the List of SKUs on Sale (Excel) >>
    This download is an Excel sheet. It will open in Microsoft Excel or Apple Numbers. 

    FAQ

    The event starts on Tuesday, June 14.

    There is no official end date for the Summer Event. When a fabric sells out, it will not be restocked. Marketing for the Summer Event will end on July 31, 2022. Sale product will continue to live in the Sale section until the end of July. At that point, any remaining sale product will come off JHilburn.com but can still be found in the Green Room.

    You should contact your Clients when the Private Sale Period starts on Tuesday, June 14. The Company will send a Client marketing email announcing the event on Monday, June 20; however, you can take orders beginning Tuesday, June 14. Getting started right away during the Private Sale Period means you will get the best selection of sale product before the Summer Event goes public to all Clients on June 20. You will also benefit because the Private Sale Period occurs during the first part of the higher CV period that runs from June 14 – 30.

    No. The price discount is only available on the fabric itself. It does not apply to the styling or personalization options.

    No, we are unable to hold fabric for Clients.

    Please contact Stylist Care or Fit Advice.

    Reference your pURL to see the swatch and image of the products available in that fabric.

    Use the Fabric Inventory tab in Green Room to get the most up-to-date inventory status of SKUs.

    Your Client can order ALL product online provided he has a confirmed fit profile for the category he is purchasing. Make sure to keep an eye out for Open Web Orders through Green Room in case your Client sends his shopping bag to you for review.

    Private Sale period (June 14 – June 19):

    • All Categories PV-Q (Personal Qualifying Volume) = 100% of the sale price
    • Custom Shirt CV (Commissionable Volume) = 100% of the sale price 
    • All other Categories CV (Commissionable Volume) = 75% of the sale price

    Public Sale period (June 20 thru July 31):

    • All Categories PV-Q (Personal Qualifying Volume) = 100% of the sale price
    • Custom Shirt CV (Commissionable Volume) = 100% of the sale price 
    • All other Categories CV (Commissionable Volume) = 75% of the sale price

    You are paid on your CV (Commissionable Volume).  Your PV-Q (Personal Qualifying Volume) dictates your payout percentage on the CV. Please reference the Career Plan for any further questions regarding earnings.

    Sale prices will be visible on JHilburn.com, with sale items merchandised in the Sale section only. “Sale” will be added to the main website navigation categories and will take you to the main Sale page. The Custom Shirts included in the bundled promotion “Buy 3 or More, Get $20 Off Each Shirt” will be on a separate campaign page — click “Shop Shirts” on the main Sale page to go to the Shirt Bundle campaign page. (See visual above.)

    The return policy is no different on sale items from regularly priced products. We ask our Clients to provide any returns or exchanges within ninety (90) days of the product delivery. However, because we are not replenishing the sale fabrics, remakes may not be possible because the fabric may be sold out. Please contact Stylist Care or Fit Advice so they can help you find a similar fabric style for your Client if an item needs to be returned or exchanged.

    No. At this time, there will be no Spring/Summer 2022 fabrics on sale. Bundle pricing on select $128 shirts is only available for orders placed during the Summer Event.

    No. All suits are listed with separated SKUs for jackets and trousers.

  • Sales Tools 2.0 FAQ

    Note: Since we published this FAQ, we’ve received some additional questions regarding sales requirements for seasonal swatches, and how we are handling Sales Tools 2.0 for New Stylists. These additional questions and answers are now in the Q&A at the end of this article.

    Your J.Hilburn Stylist Development Team and Product Team are proud to present our new Sales Tools 2.0! We have been working with a dedicated team of Stylist developers and beta testers to provide the most compact and portable way to carry your J.Hilburn Sales. The official format of Sales Tools will change to this new system starting July 14, 2022. 

    All Stylists will receive their Fall/Winter 2022 swatches in the new format, with the basic Sales Tools 2.0 components, for FREE! Stylists attending Annual Summit 2022 will receive their Sales Tools onsite at the event, with non-attendees being shipped their Sales Tools after the event. Also, pre-order is now open in the Stylist Store for attendees who would like to purchase add-on items, which can also be picked up at the event. Read on for all the details!  

    FREE – PROVIDED FOR FALL/WINTER 2022 AT NO ADDITIONAL COST

    The following components will be provided to all Stylists for Fall/Winter 2022 at no additional charge, and may be picked up at Annual Summit 2022 or shipped to you after the event.
     
    • 2 Handsomely Branded Presentation Boxes
      • Box 1: Seasonal Shirts and Knits swatches
      • Box 2: Seasonal Suits, Casual Pants and Outerwear swatches
    • A set of 42 Divider Tabs to keep your swatches organized
    • Each box comes with:
      • An elegant velvet-covered merchandising board
      • An elastic loop to keep everything secure

    Shirting and Knit swatches are on individual swatch cards. Suiting, Casual Pants and Outerwear fabrics are on larger individual swatch cards.

    AVAILABLE FOR PURCHASE — RECOMMENDED

    • Essentials Swatches
    • A new Contrast Thread Color and Monogram Display
    • The first official J.Hilburn Button Cards — 1 for Shirting and 1 for Suiting
    • 5-packs of additional velvet-covered Styling Boards so that you can prepare multiple outfits for your day’s appointments
    • Sportcoat Linings
    • And last but not least, new Belt Shorties!

    Visit the Stylist Store today to pre-order additional items! (In Green Room, select “Stylist Store” from the “Training & Resources” menu.)

    Did you catch the video trailer we recently shared about the new Sales Tools 2.0? Click the button below to see the new system in action! 

    Previous slide
    Next slide

    Sales Tools 2.0 FAQ

    • Small Presentation Box (with elastic loop and merchandising board)
    • Large Presentation Box (with elastic loop and merchandising board
    • Fall 2022 Seasonal Swatches
    • 42 Divider Tabs

    The following items are available a la carte, or you can purchase an Everything Bundle for $500 ($70 discount off total a la carte price), which includes 1 of each of the following items:

    • Additional Small Presentation Box (with elastic and merchandising board) — $20
    • Additional Large Presentation Box (with elastic and merchandising board) — $20
    • Additional set of Fall/Winter 2022 Seasonal Swatches — $190
    • Full set of Essentials Swatches — $165
    • Sportscoat Lining Swatches — $35
    • Button Card Set (2) – $25
      • Shirting Buttons
      • Suiting Buttons
    • Contrast Thread Color and Monogram Display — $10
    • Additional set of 42 Divider Tabs — $20
    • Belt Shorties — $75
    • Additional Styling Boards (set of 5) — $10

    Visit the Stylist Store today to pre-order additional items! (In Green Room, select “Stylist Store” from the “Training & Resources” menu.)

    Large Presentation Box Dividers:

    • Suiting (1)
    • Outerwear (1) 
    • Essentials (1)
    • Limited Edition (2)
    • Sportcoat Only (1)
    • Favorites (2)
    • Sale (2)
    • Performance (2)
    • Formal (1)
    • Casual Pants (1)
    • Denim (1)
    • Blank Dividers (5)

    Small Presentation Box Dividers:

    • Shirting (1)
    • Knits (1)
    • Essentials (3)
    • Limited Edition (3)
    • Favorites (3)
    • Sale (3)
    • Non-Iron (1)
    • Performance (2)
    • Blank Dividers (5)

    Each Stylist will receive an Fall/Winter 2022 Sales Tools 2.0 Set:

    • Two Presentation Boxes with elastic loops, merchandising boards and divider tabs
    • Full set of Fall/Winter 2022 seasonal swatches

    No. Whether you are attending Annual Summit 2022 and shipping your Sales Tools 2.0 home, or if you are not attending and you receive your Sales Tools 2.0 after the event, shipping is free.

    Yes, Stylists can purchase the components a la carte or they can order the Everything Bundle. See #3 above for pricing.

    If you attend Annual Summit 2022, you will be handed your new Sales Tools after you sign in at registration. If you can’t attend Summit, you will receive your Sales Tools via UPS the last week of July.

    Yes, Stylists can purchase a maximum of three sets of Sales Tools.

    All Active Stylists who have sold over $1,000 in the last 12 months will receive the free Sales Tools 2.0 Set.

    Yes, all the new components of the Sales Tools 2.0 will be in the New Stylist Kit and it will come in a beautiful new presentation box.

    No. You will need to reuse the boxes sent to you in your introductory Sales Tools 2.0 Set for future seasons. If you want additional boxes after this initial launch, you will always have the opportunity to purchase them in the Stylist Store.

    Existing Stylists who sell over $1,000 in the prior 12 months will be shipped seasonal sales tools.

    No, Stylists who join as Digital only will not receive sales tools and seasonal swatches. If these Stylists would like to upgrade and receive seasonal sales tools on an ongoing basis, they can purchase a Digital Stylist Upgrade for $300 in the Stylist Store, which includes Seasonal Swatches on an ongoing basis, 2 presentation boxes, divider tabs, merchandising board and Essential Swatches (one time only).

    Yes, a New Stylist who joins in June or July joins the business in what we consider crossover months, and will receive the entire set of New Sales Tools (2 presentation boxes with the divider tabs and merchandising board, Fall 2022 Seasonal Swatches, Essential Swatches, Lining Swatches, Assembled Button Cards, Contrast Thread and Monogram Display and Belt Shorties).

    Yes, any New Stylist that enrolls with J.Hilburn after the launch of the New Sales Tools, will receive the New Sales Tools in the New Stylist Kit moving forward. This will include 2 presentation boxes with divider tabs and merchandising board, Fall 2022 Seasonal Swatches, Essential Swatches, Lining Swatches, Assembled Button Cards, Contrast Thread and Monogram Display and Belt Shorties.

  • How To: Access Another Return Label

    If you are processing a return, and you or your Client cannot find the email containing the return shipping label, you can access it again under the “Manage Return” section in the Green Room.

    1. Log in to the Green Room.
    2. Hover your mouse over “My Orders”.
    3. Select “Manage Returns” from the drop down menu. This brings you to any orders you have submitted for a return.
    4. Locate the desired return, and select “Reprint Label” from the far right column.
    5. You can print the label or copy and paste it into an email to send to your Client.